Stargazing spots in Gandikota for clear night sky views
The best stargazing spots in Gandikota are not inside a building, not beside a bright roadside stall, and not necessarily at the most famous fort monument.
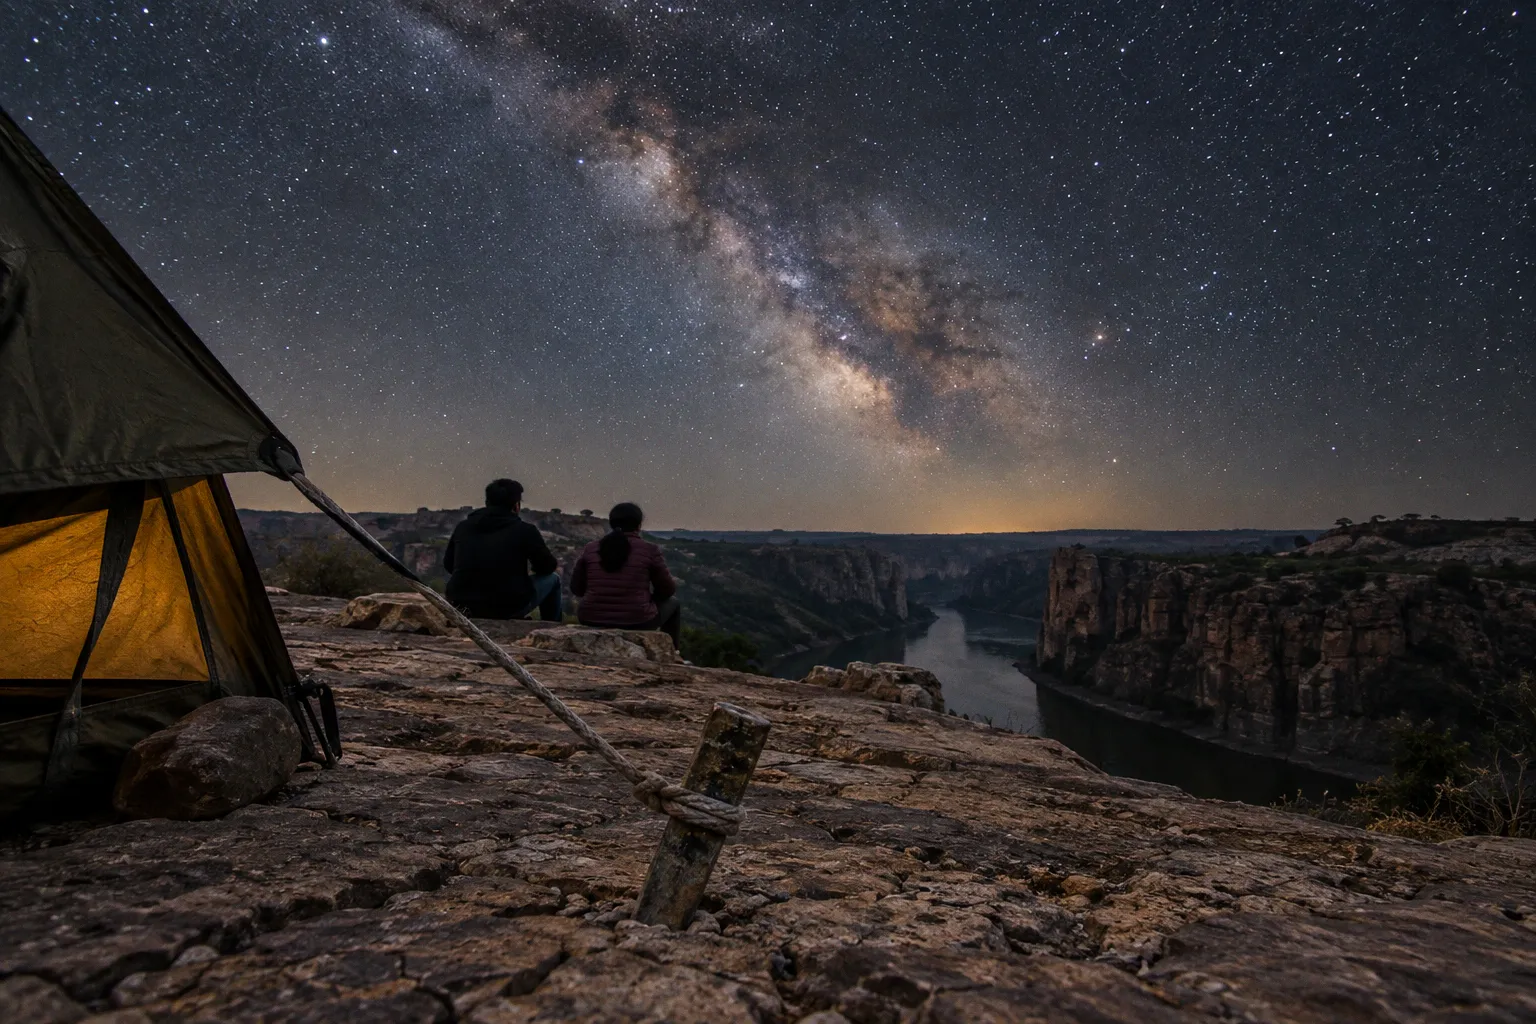
They are open, elevated areas along the Pennar gorge rim where artificial light is limited and the horizon remains unobstructed.
Gandikota sits on the Pennar River in Andhra Pradesh’s Kadapa district, approximately 15 km from Jammalamadugu. The canyon’s remote setting produces low light pollution compared with urban areas. On a clear night, you can see dense star fields, recognizable constellations, and—under suitable moon and weather conditions—the Milky Way. The location also works for astrophotography, provided you treat the cliff edge as a hazard zone rather than a scenic backdrop.
The practical window is October through February. From March to May, daytime temperatures often exceed 40–45°C. The sky can remain clear after sunset, but the heat makes a full outdoor schedule inefficient and physically demanding. Winter gives you cooler ground conditions, drier weather, and a more manageable overnight camp.
The Pennar Gorge as a Natural Dark-Sky Area
Gandikota does not need an official dark-sky designation to be useful for astronomy. Its advantage is geographic: the canyon is away from dense urban development, and the main viewing areas around the gorge and fort are exposed to large sections of sky.
That does not mean every location is dark at all times. Cliff-side camping groups may use lanterns, campfires, vehicle lights, and sometimes amplified music. A campsite can have excellent sky visibility while still suffering from local light interference. Your viewing position and timing matter.
The strongest conditions usually come from a combination of four factors:
- Low moonlight. A bright moon can wash out faint stars and reduce Milky Way contrast. A new-moon period is generally more suitable for deep-sky viewing.
- Clear, dry air. Winter nights usually provide better working conditions than the hot season.
- Distance from camp lighting. Move away from tents, fire rings, generator lights, and parked vehicles where permitted.
- Open horizon. The gorge rim and elevated grounds provide broader sky exposure than enclosed courtyards or areas surrounded by walls.
Do not judge a site only by how dark it appears immediately after arrival. Human vision needs time to adapt. A phone screen, white flashlight, or vehicle headlamp will reset that adaptation within seconds. Use a red light at low output. A headlamp with a red mode is more useful than a high-powered white beam for both walking and equipment setup.
For general navigation, a white beam of roughly 200–300 lumens is usually sufficient. For astronomy work, the red mode should be much lower. The purpose is not to illuminate the entire campsite. It is to prevent a misplaced tripod leg or loose stone from becoming a problem without destroying night vision.
Gandikota offers dark-sky conditions, not guaranteed darkness. Camp lighting and group activity can change the viewing quality within minutes.
The gorge rim also creates a physical risk that does not exist at a flat field. Darkness reduces depth perception. Uneven rock, loose gravel, sudden drops, and unmarked edges become difficult to identify after sunset. Keep your viewing position well back from any drop-off. Do not walk backward while framing a photograph. Do not use the outer edge of the cliff as a tripod line.
Cliff-Edge Vantage Points for Milky Way Photography
The cliff-side areas along the Pennar gorge are among the strongest stargazing spots in Gandikota canyon because they combine elevation, open sky, and clear sightlines across the gorge. They are also the locations where poor judgment has the highest cost.
A good photography position has three characteristics:
1. Stable ground. The tripod must stand on compact rock or firm soil, not on loose gravel at the edge.
2. A clear field of view. Avoid trees, tents, walls, and nearby structures blocking the intended section of sky.
3. Controlled movement around the camera. Once the exposure begins, people walking close to the tripod can cause vibration and light trails.
The best composition depends on the target. For a broad Milky Way frame, use a location where the gorge, fort structures, or distant terrain occupy the lower portion of the image without blocking the sky. For star trails, choose a fixed foreground object and leave more sky in the frame. For simple visual observing, the camera setup is unnecessary. A reclining position away from the cliff edge will usually provide a better field of view than standing beside a precarious overlook.
Basic camera setup
The following settings are starting points, not universal rules:
- Manual focus set to infinity, then checked through magnified live view.
- Wide-angle lens with a reasonably large aperture.
- Shutter speed adjusted to limit star trailing.
- ISO raised only as far as the camera’s noise performance allows.
- RAW capture for later control of highlights, shadows, and color.
- Two-second timer or remote release to reduce camera movement.
- Lens hood attached to limit stray light from camps and vehicles.
Do not focus by pointing the lens at the brightest visible star and turning the ring until it looks sharp on the rear screen. That screen can mislead you. Focus at high magnification, confirm against a distant light or star, and tape the focus ring if it moves easily.
A tripod does not make an unsafe position safe. Extend the legs fully only when necessary. Keep the center column low. Hang nothing from the tripod if wind or unstable ground can shift it. A heavy camera bag can improve stability on firm ground, but it should not be allowed to swing or drag a leg toward the edge.
Selecting a safe cliff viewpoint
Before setting up, inspect the area in daylight. Mark the route back to camp. Identify the location of the nearest light source and note whether the ground changes from solid rock to loose rubble.
Use this sequence:
1. Walk the proposed position before sunset.
2. Confirm the return route without relying on a phone screen.
3. Set a hard boundary beyond which nobody will walk after dark.
4. Place the tripod away from the boundary, not directly beside it.
5. Keep spare batteries, memory cards, and cables in one accessible pouch.
6. Pack the camera before moving the tripod.
7. Leave the location with a white light available for the final equipment check.
A remote shutter release is useful, but it does not replace supervision. In a group, designate one person to control movement around the camera. A passing flashlight can ruin a long exposure. It can also reveal how quickly a careless route approaches the gorge edge.
The cliff rim is not the only option. If the wind is uncomfortable, the ground is unstable, or the area is crowded, move inland. A darker image with a safe foreground is better than a technically stronger image made from a hazardous position.
Historic Fort Grounds: Stargazing Near Ancient Architecture
Open elevated areas around Gandikota Fort provide a second class of viewing location. The Madhavaraya Temple and Jama Masjid are useful foreground subjects for night photography, and the surrounding grounds can offer unobstructed views when the area is not crowded or brightly lit.
These locations require more control than an isolated campsite. Stone walls and monuments can block low sections of the horizon. Foot traffic, security arrangements, visitors, and nearby lights can interrupt exposures. The visual advantage is architectural composition, not necessarily maximum darkness.
The fort grounds work best for:
- Wide-angle images combining masonry and stars.
- Short observing sessions before returning to camp.
- Group photography where a clearly defined walking area is useful.
- Early-night or late-night viewing when visitor activity has reduced.
- Orientation shots that establish Gandikota’s historic setting.
They are less suitable for a long uninterrupted imaging session if lights remain active nearby. Artificial light can create color casts on stone surfaces and reduce contrast in the sky. If the structure is illuminated, expose for the sky and accept that the foreground may become dark, or make separate exposures for later blending. Do not move into restricted areas or climb monuments to improve composition.
Architecture and night photography
Ancient structures create a strong foreground because their edges remain readable under starlight. The problem is dynamic range. A dark sky and a pale stone wall can require different exposures. A single frame may either lose the building in shadow or overexpose any artificial lighting.
A controlled approach is straightforward:
- Compose the frame before full darkness.
- Focus on the stars, then check the foreground separately.
- Take a test exposure with the structure included.
- Reduce exposure if lamps create blown highlights.
- Keep the camera fixed if you plan to combine exposures.
- Avoid painting the monument with a flashlight unless local rules explicitly allow it.
Light painting is often treated as a harmless creative technique. At a heritage site, it can disturb other visitors, damage the viewing experience, and create unwanted exposure on carved surfaces. It also produces inconsistent results when several people use different lamps. Use existing ambient light unless you have a clear reason and permission to add more.
The fort area can also be more practical for travelers who do not want to sleep beside the gorge. You can observe from the elevated grounds, then return to a designated tent area or accommodation. This separates sightseeing from overnight camp logistics and reduces the amount of equipment carried in darkness.
When to Plan the Best Night Sky Viewing in Gandikota
The recommended season for Gandikota camping and stargazing is October through February. These months generally provide cooler conditions and clearer, drier nights. They are also easier for combined schedules that include daytime fort exploration, sunset photography, dinner, and several hours outside after dark.
The summer period from March to May presents a different calculation. Daytime temperatures often exceed 40–45°C. The night may still be visually useful, but the daytime heat affects transport, water consumption, battery storage, and physical tolerance. A traveler planning an overnight astronomy session must still reach the site, set up camp, manage food, and remain functional after sunset. Clear skies do not cancel heat exposure.
A workable schedule follows the temperature rather than the clock:
- Explore exposed fort areas early in the morning.
- Avoid extended walking during the hottest part of the day.
- Set up camp before dark.
- Eat and organize equipment before the main viewing period.
- Keep water accessible at the camera position.
- Pack sensitive electronics away from direct sun.
- Leave enough time for a safe return before fatigue becomes a factor.
Moon phase deserves equal attention. A full moon is useful for illuminating the gorge and fort structures, but it is poor for faint stars and Milky Way contrast. A darker lunar period favors astronomy. If your priority is a recognizable foreground rather than maximum star density, some moonlight can help. The correct choice depends on the image or observation target.
Weather forecasting should cover cloud, wind, and visibility. A clear afternoon does not guarantee a clear night. Thin high cloud can be difficult to see without a light source but will soften stars and reduce contrast in photographs. If the sky deteriorates, stop chasing the original plan. Move to a sheltered, safe area and protect the equipment.
Gandikota Camping and Night Sky Visibility
Camping near the gorge can place you close to the best viewing areas, but it also introduces the largest sources of interference. Fires, lanterns, kitchen lights, generators, vehicle movement, and group noise all affect the experience. A campsite is not automatically an astronomy site.
Local tent rentals may start around ₹500 and extend to approximately ₹1,500 for basic arrangements. Full camping packages with meals and a campfire commonly range from about ₹2,000 to ₹3,500 per person. Exact inclusions vary. A low-cost tent may provide shelter only. A higher package may include bedding, meals, a fire, and organized activities. None of those features guarantees a dark or quiet sky.
Ask the operator specific questions before committing:
- Is the tent positioned near the gorge rim, inland, or in an open ground?
- Are meals included, and at what times?
- Is the campfire shared or private?
- Are generators used after dark?
- Can guests move away from the main camp for stargazing?
- Is a toilet available on-site?
- What lighting remains on through the night?
- Are transport and parking included?
- Is the site operational during the dates you want?
The answer to the lighting question is more useful than a general promise of a scenic location. A tent can be beside the gorge and still face directly into a bright common area. Conversely, a less dramatic inland camp may provide better darkness if it is away from lamps and vehicle traffic.
What to bring for an overnight astronomy setup
Pack for function. You do not need expedition-grade equipment for basic stargazing, but you do need control over light, temperature, power, and movement.
- Headlamp with red mode and a separate white-light mode.
- Spare batteries or a charged power bank.
- Water sufficient for the full outing, not only the drive.
- Closed footwear with a stable sole.
- Light layers for winter nights.
- Groundsheet or compact sitting pad.
- Camera tripod with secure leg locks.
- Lens cloth and a sealed pouch for dust protection.
- Offline map or saved directions.
- Small first-aid kit.
- Personal medication.
- Waste bag for every item brought to the viewpoint.
A sleeping bag rated for a specific temperature is more reliable than a generic blanket, but local conditions and personal tolerance vary. Do not leave electronics exposed on damp ground. Keep batteries warm and dry. Cold reduces battery performance; dust and grit damage moving parts and lens mounts.
If you are carrying a telescope or binoculars, keep the setup modest. A small pair of binoculars can be more useful for casual sky scanning than a large telescope transported without a stable mount. Heavy equipment increases setup time and creates more objects to carry back across uneven ground.
A Practical Route Through the Main Viewing Areas
The most efficient Gandikota stargazing plan uses different locations for different purposes rather than forcing one site to perform every function.
Late afternoon: inspect the ground
Arrive with enough daylight to identify the fort area, the gorge rim, the camping zone, and the route between them. Mark hazards physically in your memory. Do not assume a path will remain obvious after sunset.
Sunset: use the gorge for orientation
The gorge rim provides the widest visual context. Use this period to select a safe foreground, check the position of visible lights, and decide whether wind or crowding will interfere with the night session.
Early evening: photograph the fort grounds
The Madhavaraya Temple, Jama Masjid, and surrounding structures offer architectural subjects while there is still enough residual light to define stonework. This is the least demanding time for composition because you can see your footing and equipment.
Later night: move to the darkest practical position
If the camp is active, walk only along the route inspected before dark. Choose a point away from direct lamps and campfire glare. Keep the group together. If the selected area is crowded or the ground is unstable, abandon it. There is no operational reason to force a particular viewpoint.
Before sleep: secure all equipment
Pack camera bodies, lenses, batteries, and food containers. Do not leave loose objects near the tent or cliff route. A dropped lens cap is a minor inconvenience in daylight. At night, searching for it can lead people into unsafe terrain.
The best night-sky position is the one that gives you a clear horizon without requiring you to stand near an unprotected edge.
Common Errors That Reduce Sky Visibility
Most poor stargazing sessions at Gandikota do not fail because the sky is unusable. They fail because the setup is poorly timed or badly positioned.
Arriving after dark
Late arrival forces you to unload, navigate, and pitch a tent under artificial light. It also removes your chance to inspect the ground. Reach the site before sunset whenever possible.
Standing beside the campfire
A fire feels useful for warmth and social activity. It is also a bright, unstable light source that damages night vision and affects photography. Observe from a position outside the direct glow.
Using a phone as the main light
A phone screen is bright, reflective, and difficult to control. It destroys dark adaptation and offers poor illumination for uneven ground. Use a headlamp with a red mode and keep the phone dimmed.
Trusting a promotional description
Terms such as cliff camping, dark sky, and glamping describe a category, not a guarantee. Confirm the actual tent position, lighting, access, and inclusions. A package with a campfire and meals may be convenient but less suitable for serious astronomy.
Ignoring the moon
A clear sky with a bright moon may look impressive but will not show the same faint detail as a darker night. Check the lunar phase before selecting your dates.
Chasing the edge for a better frame
The gorge is already the subject. Moving closer to the drop-off adds risk without necessarily improving the image. Back away, use a wider lens, and include the rock or fort structure as a controlled foreground.
Final Field Protocol
Use the following sequence before leaving camp:
- Confirm the weather and moon conditions.
- Charge camera batteries and power banks.
- Pack red and white lights.
- Carry water and closed footwear.
- Inspect the route in daylight.
- Identify a safe viewing boundary.
- Keep away from the unprotected gorge edge.
- Avoid direct campfire and generator light.
- Keep tripods on stable ground.
- Do not enter restricted fort areas.
- Do not leave food, batteries, plastic, or cable ties behind.
- Pack all equipment before moving through the dark.
- Return to camp before fatigue compromises balance and judgment.
Gandikota is a strong South India destination for stargazing because the Pennar gorge provides open terrain and relatively low surrounding light pollution. The best results come from treating the location as a field operation: select the season, control artificial light, inspect the ground, and choose the safest practical viewpoint. October through February offers the most reliable overall balance. The gorge rim is effective for wide sky views. The fort grounds add architectural foregrounds. Local camping packages can reduce logistics, but their lighting and group activity may limit serious observation.
The final rule is simple. Do not trade a safe position for a better angle. The sky will still be there from several metres farther back.