Gandikota canyon camping: essential gear and supply checklist
Forty degrees Celsius on exposed quartzite. Two liters of water as a starting point, not an automatic ceiling. Nightfall that turns the Pennar Gorge into a dark maze of uneven ground, blind corners, and unfenced edges.
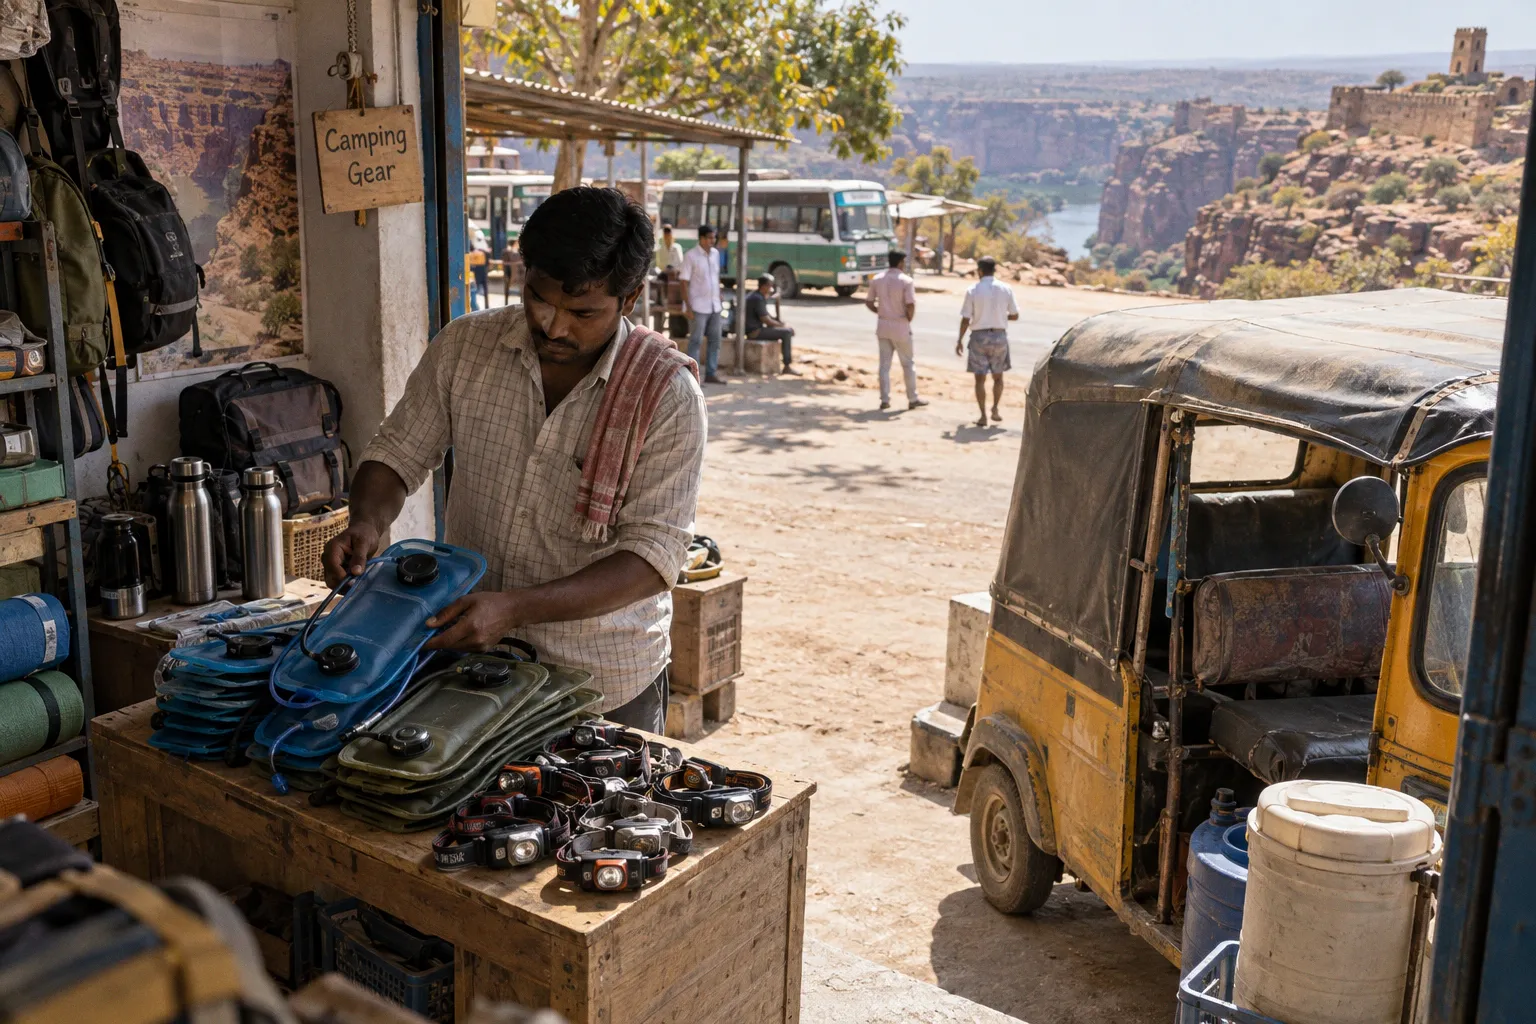
That is the operating envelope for anyone planning an overnight stay at Gandikota, and the gear list has to match it.
There is no advantage in carrying decorative equipment or relying on vague estimates. Every item should solve a specific problem: unstable footing, heat, unreliable power, limited water, poor visibility, or the consequences of being farther from help than expected. The canyon rewards preparation and makes improvisation expensive.
The terrain around the fort and gorge is a mixture of fractured rock, loose grit, worn paths, exposed roots, and sharp-edged boulders. Conditions change between the temple approach, the rim, the descent toward the Pennar, and the flatter areas used by camps. Trail marking may be inconsistent, especially once you leave the most visited viewpoints. Water found near the river should not be treated as drinking water without suitable purification.
This is the practical Gandikota canyon camping gear checklist: what belongs on your body, in your daypack, and at the campsite.
Navigating the Pennar Gorge Terrain: Footwear and Mobility
Footwear is the first decision to get right. A scenic walk near the fort can become a rough descent once the route moves toward the gorge, and a campsite that looks close on a map may involve loose rock, uneven ground, or a return after sunset. The surface is hard on soles and unforgiving when a foot lands at an angle.
Choose shoes that protect the foot without turning every step into a workout.
- Trail-grade hiking shoes with a secure heel and aggressive lugs. A lug depth around 4–5 mm is a useful reference for mixed dirt and rock, but grip pattern matters as much as the number. The sole should bite into loose sections and remain stable on flatter slabs.
- A firm, protective toe box. Sharp quartzite edges and loose stones can catch the front of a shoe during a descent. A soft fabric upper offers little protection when the foot strikes rock.
- Closed-cell foam or supportive insoles. Hard ground transmits impact directly through the heel and arch. A better insole will not compensate for poor shoes, but it can make a long day on rock considerably less punishing.
- A 15–20 litre daypack. This is large enough for water, a layer, food, first aid, a headlamp, and sun protection without becoming awkward between boulders. A larger trekking pack belongs at camp unless you are moving between sites.
- Collapsible trekking poles. They are particularly useful where erosion has cut channels into the path or where loose stones shift underfoot. Aluminium and carbon both work; the important points are a reliable locking mechanism and tips that are not worn smooth.
- A small dry bag or pack liner. Dust and grit find their way into every pocket. A liner also protects electronics if a sudden shower or a leaking bottle turns the inside of the pack wet.
The most common footwear mistake is choosing for appearance rather than terrain. Open sandals may be comfortable around a managed campsite, but they leave toes and ankles exposed on the approach to the gorge. Soft casual shoes offer little lateral support when the path tilts or a stone rolls. New boots are another avoidable problem. Break them in before the trip; blisters become much harder to manage when the next day involves more walking in heat.
Pack socks that dry quickly. Synthetic or merino-blend pairs are more practical than cotton because they move moisture away from the skin and remain more comfortable after perspiration. Bring at least one spare pair for the overnight stay, and keep it in a dry bag rather than at the bottom of the pack.
At Gandikota, footwear is not a style decision. It is the layer between your feet and sharp rock, loose grit, heat, and a long walk back after the light goes.
Hydration and Heat Management in 40°C Conditions
The water plan deserves more attention than almost any other part of the overnight canyon stay packing list. Daytime heat can be severe in the hotter months, and exposed rock reflects and stores heat long after the air temperature has already become uncomfortable. Shade is limited in the gorge, and a river nearby is not the same thing as a dependable drinking-water source.
The right quantity depends on the season, route, duration, access to camp water, and whether meals are provided. For a single active canyon day, two litres should be treated as a starting point rather than a universal rule. Longer walks, intense heat, or uncertain resupply may require more. Ask the operator where drinking water is available before setting out, then carry a reserve rather than assuming the next point will be open or usable.
A practical hydration setup includes:
- One rigid bottle or hydration bladder for regular drinking. A bladder makes it easier to drink while walking, but a rigid bottle is easier to inspect, clean, and use for mixing electrolytes.
- A separate backup bottle. Keep it in another section of the pack so one leak does not remove your entire supply.
- Electrolyte or oral rehydration sachets. These are useful after heavy sweating, especially when food and water intake have been irregular. Follow the preparation instructions rather than making a concentrated mixture.
- A purification method for untreated water. Chlorine dioxide tablets, a suitable filter, or another method designed for the water source can provide a backup. A filter does not necessarily address every contaminant, so do not treat any river or pooled water as safe simply because it looks clear.
- A collapsible container for camp. A 5-litre container is useful for topping up bottles, preparing food, and basic washing when the campsite provides a water point but not a convenient tap beside every tent.
- A leak-proof bottle cap and a simple repair option. A small roll of strong tape can temporarily deal with a cracked lid, damaged hose, or torn dry bag.
Electrolytes are not a substitute for shade, food, or rest. Heat management begins with the schedule. Plan the most exposed walking for the cooler parts of the day whenever the route and operator allow it. Early morning is generally more forgiving than the middle of the afternoon; late-day walking still requires enough light to identify the ground and return safely.
Pack clothing that protects rather than merely exposes skin to airflow:
- A wide-brim hat or scarf that covers the neck and ears.
- A loose, long-sleeved shirt made from a breathable synthetic or other quick-drying fabric.
- Lightweight trousers for rock, insects, and sun protection.
- High-SPF, water-resistant sunscreen, reapplied during the day.
- Lip balm with sun protection.
- Sunglasses with reliable UV protection; glare from pale rock can be tiring even when the sky is hazy.
- A cooling towel if you find it useful, although it should be treated as a comfort item rather than a substitute for shade and water.
Watch for headache, unusual fatigue, dizziness, nausea, confusion, clumsiness, and worsening cramps. Move the affected person out of the sun, loosen excess clothing, cool the skin, and seek assistance early. If someone is confused, vomiting repeatedly, unconscious, or unable to drink safely, do not rely on home treatment or wait for the symptoms to pass.
Powering Your Stay: Electronics and Off-Grid Essentials
Power at a managed campsite is a convenience, not a guarantee. A listed charging point may mean access to a generator, an inverter, or a socket that is available only during a particular operating window. The arrangement can also be shared. Ask what is actually provided: whether the socket is in the tent or a common area, when it works, and whether charging is supervised.
The safest approach is simple: arrive with the devices you need already charged and carry enough backup power for your own use. Do not build the trip around an assumption that a campsite outlet will be available at the exact moment your phone or camera needs it.
For most travellers, the useful electronics list is short:
- A 20,000 mAh power bank is a reasonable baseline for a phone-led trip. Choose a model with ports that match your devices and check its charge level before leaving.
- A headlamp with a dependable beam and a red-light mode. A headlamp leaves both hands free on uneven ground. Red light is less disruptive around camp, but white light is preferable when you need to inspect a route properly.
- Spare batteries or a second charged headlamp. Confirm whether your model uses AAA cells, a proprietary battery, or USB charging.
- Charging cables that are long enough for the campsite layout. A short cable may be inconvenient if the only outlet is in a common area. Carry one spare cable for the phone you rely on most.
- Offline maps and downloaded booking information. Save maps before leaving reliable service, and keep your reservation details available offline. Screenshots are useful, but a phone with no battery is still no phone.
- A protective case or dry pouch for the phone. Dust, drops, and condensation are more realistic threats than a lack of advanced features.
A foldable solar panel can help on a longer independent trip, but it is not magic power. Its output depends on direct sun, orientation, dust, cable quality, and the battery accepting the charge. For a single overnight stay, a fully charged power bank is usually simpler and lighter. A panel makes more sense when you already own one and understand its limitations.
Independent travellers moving away from managed support may also consider:
- A handheld GPS or a compass paired with a printed map.
- A satellite communicator such as the Garmin inReach Mini or an equivalent device, provided it is legally usable, charged, and understood before the trip.
- A camera with spare batteries if photography is central to the visit.
- A small USB light for the tent or cooking area, separate from the headlamp.
The key point is not the size of the power bank or the number of gadgets. It is redundancy. The device that handles navigation should not also be the only light, the only camera, and the only way to contact your group.
Safety Protocols for Cliff-Side and Night Navigation
The cliff edge is not a photo prop. Many viewpoints around Gandikota are open, uneven, and exposed, with no continuous barrier separating visitors from the drop. At night, depth perception disappears and loose rock becomes much harder to read. A familiar route in daylight can feel entirely different after dark.
Treat the rim as a working hazard zone:
1. Keep a deliberate distance from unfenced edges. Do not step backward while framing a photograph, and do not let a crowd push you toward the rim. Choose a stable surface before taking out the phone or camera.
2. Use a headlamp before the route becomes completely dark. Put it on your head rather than carrying it in your hand. Keep the beam pointed at the ground when walking and raise it only when you need to inspect the route.
3. Do not explore unfamiliar paths after dark. If a viewpoint or campsite is not clearly identified in daylight, leave it for the next morning.
4. Keep children and distracted companions within reach near the edge. Phones, tripods, and group photographs divide attention at exactly the wrong moment.
5. Check the substrate before placing weight. Pale rock can look solid while the surrounding grit is loose. A trekking pole is useful for testing a questionable patch, but it is not a substitute for distance and caution.
6. Follow the campsite’s fire rules. Use only the area designated by the operator. Never place a fire close to tents, dry grass, or an exposed cliff edge, and do not assume a fire is safe because it is small.
A compact first-aid kit should be built around realistic problems rather than dramatic rescues:
- Plasters and blister dressings.
- Gauze, tape, and a crepe bandage.
- Antiseptic wipes.
- Oral rehydration salts.
- Any personal medication.
- An antihistamine if you normally carry one.
- Pain relief that you know is safe for you.
- Tweezers, small scissors, and disposable gloves.
- A whistle attached to the outside of the pack.
A whistle is useful when voices are lost in wind or across uneven ground. Agree on a simple group procedure before walking: who leads, who follows, where to regroup, and what to do if someone stops or loses sight of the others.
The surrounding rocky terrain can also contain snakes and scorpions. This does not call for panic or unnecessary handling of wildlife. It calls for basic camp habits: wear closed shoes, use a light after dark, keep clothing and sleeping gear off the bare ground where possible, and shake out shoes, bags, and bedding before putting them on or getting in.
If you are planning a self-pitched camp rather than booking a managed site, confirm the current rules and permission requirements before travelling. Regulations, access arrangements, and what is permitted on or near government land may not be obvious from an old blog post or a social-media listing. A confirmed local contact or written permission is more useful than an assumption that an empty-looking patch of ground is available for camping.
Budgeting for Managed Camping Packages vs. Independent Gear
Managed camping packages and independent camping solve different problems. A package can simplify the tent, sleeping arrangements, meals, water access, and site logistics. Independent camping provides more control over equipment, food, timing, and camp location, but it also transfers every small responsibility to you.
Prices and inclusions vary, so treat any quoted package rate as a reference rather than a permanent tariff. Before paying, ask for a current list of what is included and what is charged separately.
| Item | Managed package | Independent camper |
|---|---|---|
| Tent | Usually supplied, often shared | Bring, rent, or purchase a suitable tent |
| Sleeping mat or bedding | May be supplied; confirm the type | Source and carry your own |
| Meals | Often included in overnight packages | Carry ready-to-eat food or cook |
| Drinking water | Ask where it is available and whether refills cost extra | Carry and treat your own supply |
| Restroom access | Usually tied to the campsite | Must be confirmed before pitching |
| Lighting | Common areas may be lit; still carry a headlamp | Entirely your responsibility |
| Power | May be shared or available only at certain times | Power bank, spare batteries, or solar setup |
| Local transport | Frequently separate from the camping fee | Arrange in advance and budget for waiting time |
| Guidance and support | May be available at the site | You handle navigation and emergencies |
A managed package is often the sensible choice for a first visit, a solo traveller, or anyone who does not already own a tent, sleeping system, stove, and water containers. The value is not only the fabric shelter. It is the reduction in logistics: somebody has already arranged a pitch, a meal, and a basic operating system for the night.
Independent camping becomes more attractive when you already own the equipment and understand how to use it. Buying a complete kit for one overnight trip can cost more than expected, especially once you add a sleeping mat, stove, fuel, water storage, lighting, and transport. It also creates more weight to move across rough ground.
Before comparing prices, ask these questions:
- Is the tent private or shared?
- Are bedding and sleeping mats included?
- Is dinner vegetarian, and is breakfast included?
- Is drinking water supplied at the campsite?
- Are transport from Kadapa or Kamalapuram and local transfers separate?
- Is the charging point functional throughout the night or only during generator hours?
- What happens if weather or local access conditions change?
- Is there a designated place for cooking and waste disposal?
A managed package is not a luxury. It is a logistics layer. The heat, the cliff, and the dark remain the same, but the number of decisions you must make at camp changes.
Cooking, Food, and Camp Kitchen
If meals are not included, food becomes part of the safety plan as well as the budget. Cooking on uneven ground with limited water is slower than cooking at home, and strong wind or a poor fuel choice can turn a simple dinner into a long nuisance.
A compact camp kitchen should include:
- A small canister stove or another approved stove suitable for the fuel you can obtain.
- The correct fuel canister, checked before departure.
- A lighter and stormproof matches kept in a waterproof pouch.
- A 1–1.5 litre pot with a lid for boiling water and preparing simple meals.
- A mug, plate, and spoon or spork.
- A small knife with a sheath, if needed for food preparation.
- Biodegradable soap and a limited amount of water for washing.
- A heavy-duty rubbish bag for every item brought into camp.
- Ready-to-eat or quick-cook food that tolerates heat and transport: instant noodles, upma, khichdi, packaged rice, dry fruit, nuts, energy bars, tea, and coffee.
- A separate bag for food waste and packaging.
Keep the menu simple. A meal that needs prolonged chopping, refrigeration, or several litres of washing water is a poor match for a dry, exposed campsite. Avoid glass bottles and containers because they add weight and create a dangerous cleanup problem if broken. Store food securely and clean the cooking area after eating rather than leaving scraps near tents.
Do not use a stove inside a tent. Carbon monoxide is invisible, and a tent fabric catches fire faster than most people expect. Cook in the designated area, keep fuel away from flames, and allow the stove to cool before packing it.
Final Field Notes
A reliable Gandikota trip rests on a few unglamorous habits: carry enough water for the route you are actually walking, protect yourself from the sun before you feel overheated, keep a working light on your body after dark, and treat the cliff edge as a boundary rather than a backdrop.
Confirm the operator’s current inclusions before payment. Check transport arrangements separately, especially if you are arriving from Kadapa or Kamalapuram. Save booking details offline, carry a charged phone and a power bank, and keep at least one paper note with the campsite contact or meeting point. A weak signal is an inconvenience; a dead phone and an unclear pickup plan are a logistics problem.
For a managed overnight stay, the essential kit is compact: protective footwear, reliable hydration, sun-covering clothing, a headlamp, a first-aid pouch, offline navigation, food or confirmed meals, and backup power. Independent campers need the same personal equipment plus the complete shelter, sleep, cooking, water, waste, and emergency systems.
The canyon does not require an expedition wardrobe. It requires honest planning. Carry less of what looks impressive, and more of what keeps you walking, drinking, seeing, and thinking clearly when the rock is hot and the light is gone.